Discussion of an example project
Before digging into this section, you are strongly encouraged to read Quick start and tutorial for an introductory description on the features of Grab`n Run library.
The aim of the sample application is to give you some hints on how to use the classes in Grab’n Run and how they will behave across different contexts. The source code of the example can be found in the example folder of Grab’n Run repository.
Different extracts of code will be considered and explained in the following sections of this page but before analyzing the code it may be convenient to retrieve it and to set up an already prepared Android smart phone emulator that contains all the containers needed to run the example code..
Retrieve the example code and the emulator
Retrieve Grab’n Run full repository
At first you will need to recover Grab’n Run example code. In order to do so you need to have Git installed on your machine. The latest version can be found at Git download page.
Next open a terminal and clone the example repository into grab-n-run, a local folder located at absolute_path_to_gnr_repo, through Git:
$ cd <absolute_path_to_gnr_repo>
$ mkdir grab-n-run
$ cd grab-n-run
$ git clone "https://github.com/lukeFalsina/Grab-n-Run.git"
At the end of the process you will have all the GNR code locally including a copy of the example application and of the documentation.
Include Grab’n Run example code in your IDE
The next step is importing the example sources into an IDE. The process will be now described for both Android Studio (AS) and Android Development Tool (ADT).
- Android Studio (AS)
In the welcome window of Android Studio select from the Quick Start menu the option “Open an existing Android Studio project”.
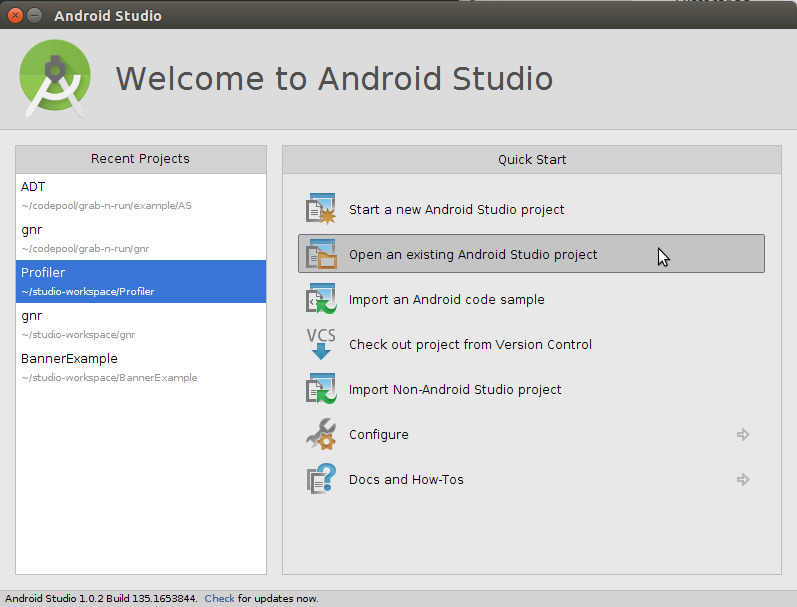
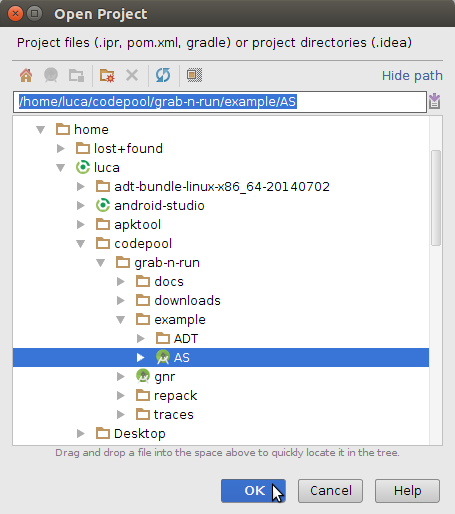
Next navigate to the grab-n-run folder in which you previously cloned the repository and then pick the project AS from the example subfolder as shown in the image below.
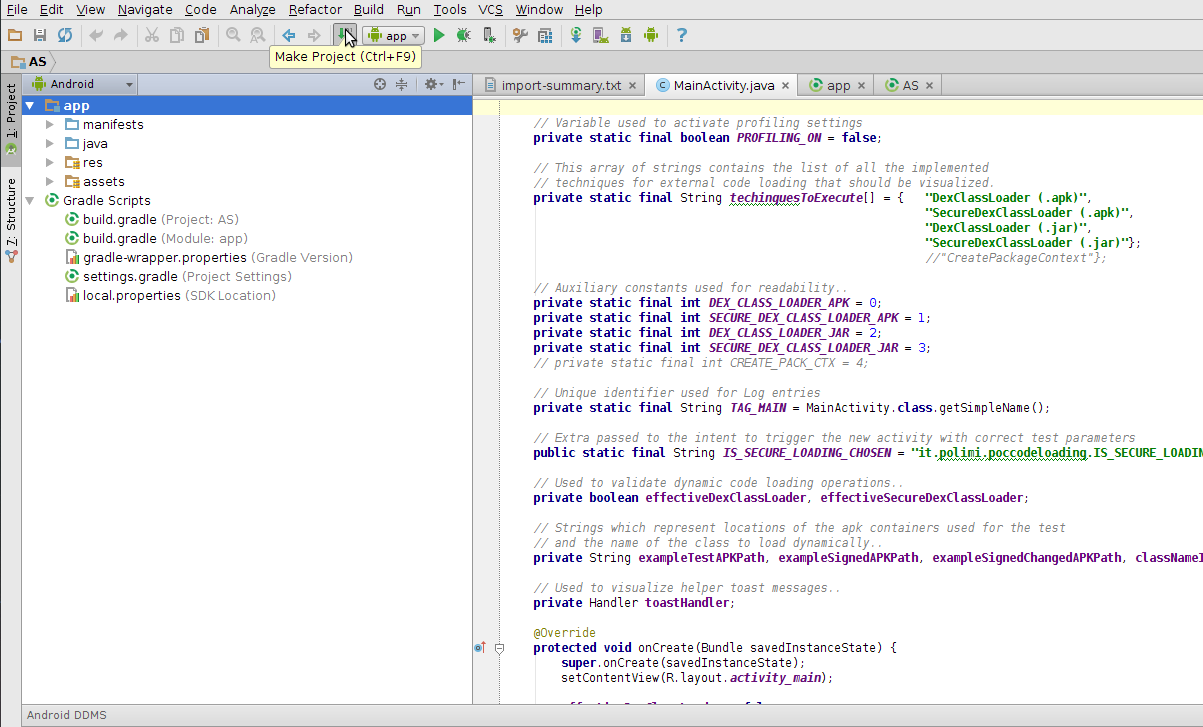
The example project should have been now successfully imported! It may be necessary to rebulit it again by picking the option “Make Project”.
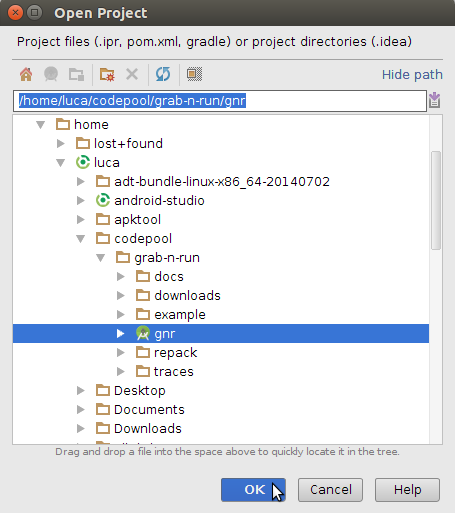
P.S. Notice that you can open in Android Studio also the original GNR library project by using the very same procedure but by picking the gnr Studio project from the main grab-n-run folder in stead of the example/AS one.
- Android Development Tool (ADT)
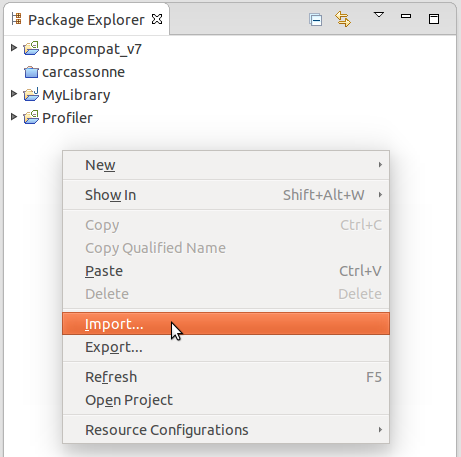
At first right click in the Package Explorer and select “Import..”
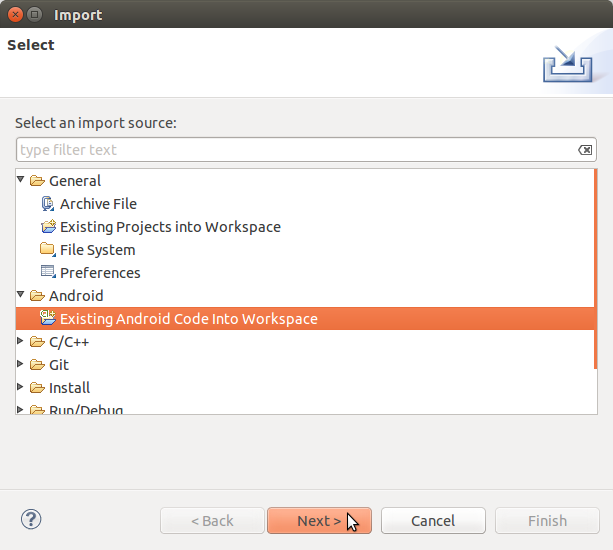
Next select under the Android folder “Existing Android Code Into Workspace” and then “Next >”
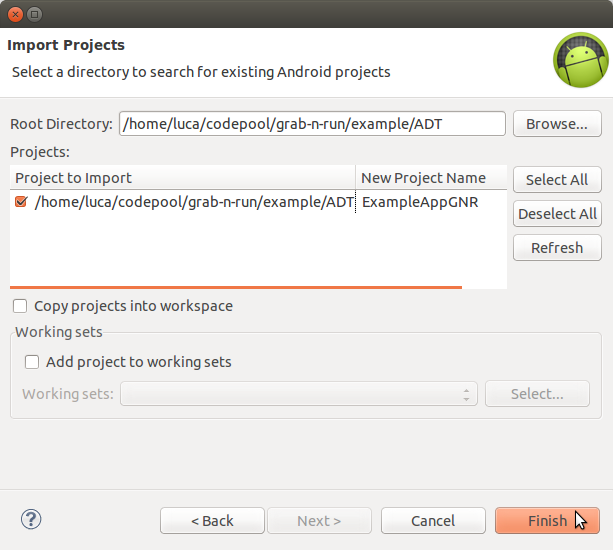
By pressing the “Browse...” button point the Root Directory to the grab-n-run folder in which you previously cloned the repository and then to the subfolder grab-n-run/example/ADT. You should be now able to the see and select the candidate project ExampleAppGNR (an example application which makes use of GNR). In the end press “Finish” to import the example project. Below you can see a screenshot which summarizes all the settings before the “Finish” button is clicked.
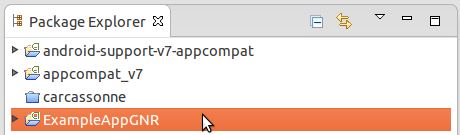
At the end of this process you should have been able to correctly import the example application!
Retrieve and set up the emulator
Then it is time to retrieve the emulator used to run the example application. You can easily find it in the assets folder of the example repository.
So once that you have located the compressed file ExampleAppGNREmu.tar.gz containing the emulator, open a terminal and at first copy this file into your home folder:
$ cd <absolute_path_to_gnr_repo>/example/
$ cp ExampleAppGNREmu.tar.gz ~
Next decompress this container:
$ cd ~
$ tar xzf ExampleAppGNREmu.tar.gz
This operation will generate two files, a folder called ExampleAppGNREmu.avd and a configuration file ExampleAppGNREmu.ini. In the end move these two files into the Android emulator folder, normally located at /home/<your_username>/.android/avd:
$ mv ExampleAppGNREmu.avd ExampleAppGNREmu.ini .android/avd
The last step consist in editing the path variable stored in the configuration file. So open ExampleAppGNREmu.ini at the final location with a text editor and change the path variable in order to match the current location of the ExampleAppGNREmu.avd folder. So if my user name is for example bill90, I need to change the path variable from path=/home/<USER_NAME>/.android/avd/ExampleAppGNREmu.avd to path=/home/bill90/.android/avd/ExampleAppGNREmu.avd.
Before starting the emulator in your IDE, remember to verify that the SDK version 17 is installed on your machine since the emulator targets that version. Otherwise you can also edit the emulator configuration from your IDE to target a different and more recent version of the SDK which is installed on your machine.
Note
Android emulator is unfortunately pretty slow and requires also a big bunch of resources and that is the reason why it may be not supported by different machines. A couple of empirical suggestions in this direction are the following:
- If possible, try to target directly SDK version 17, as it results to me that the more recent SDK version you target, the more time the emulator requires before setting up.
- It is a really good idea to enable the snapshot feature. This lets the system frame the current situation of the emulator when you turn it off and load it back whenever you restart the emulator with a significant reduction of the waiting time. This post explains how to enable the feature.
- Emulator can be switched between landscape and portrait view by pressing
ctrl + F12. This can be useful to interact properly with the example application.
When the emulator is finally set up, you can start it in either ADT Eclipse or Android Studio (it may take time depending on your machine..). Next, whenever you want to run the example code and the IDE asks which device should be used, remember to select this emulator as the running Android device.
In case you need to integrate this previous concise walk-through, please give a look at these other resources:
List of example containers
In order to understand correctly the following detailed discussion, it is fundamental to first introduce the containers (jar and apk archives), retrieved for the code loading in the example code. Here is a list of the string variables that store the path to various containers:
exampleSignedAPKPath: URI of a benign toy apk container signed with a valid developer certificate.exampleTestAPKPath: path location pointing to the same benign apk container but this time signed with the Android Debug Certificate.exampleSignedChangedAPKPath: URI pointing to a handled version of the same container stored atexampleSignedAPKPathin which a part of the signatures has been modified.jarContainerPath: path location to the benign jar container used to customize the view elements inside an example activity.jarContainerRepackPath: URI pointing to a malicious repackaged version of the original container stored atjarContainerPath.
MainActivity.java
MainActivity is the entry point of the sample application. In its overloaded method onCreate() it initializes through a ListView a set of buttons used to select the different test cases present in the application.
DexClassLoader (apk) vs SecureDexClassLoader (apk)
In this first scenario you will consider how to retrieve an Activity class, whose name is NasaDailyImage, stored in the apk container, called test.apk, through the use of DexClassLoader and SecureDexClassLoader.
The relevant code in this case is the one of the two methods setUpDexClassLoader() and setUpSecureDexClassLoader(), which are triggered by tapping the related two buttons on the MainActivity view.
setUpDexClassLoader()
In this method a standard initialization of a DexClassLoader is applied.
So at first the usual application-private, writable directory for caching loaded .dex classes must be set up.
Then a DexClassLoader object is initialized using test.apk, a container located directly in the phone external storage ( as described by exampleTestAPKPath), as its jar path for the classes to load.
Finally the NasaDailyImage Activity is loaded. If such an operation is successful the simple name of the loaded class is shown to the user through a toast message; otherwise different exceptions are raised and show again through a toast message an appropriate helper message.
setUpSecureDexClassLoader()
In this method repeated loadClass() calls are performed on differently initialized SecureDexClassLoader instances in order to show different behaviors of the loader class while retrieving the usual NasaDailyImage Activity.
At first a SecureLoaderFactory object is created. Then this instance is used to generate three SecureDexClassLoader that covers different cases and ends up with different results on the load operation:
Test case 1: Load a class through
SecureDexClassLoaderwithout providing an associative map for certificates locationThis first test case shows a possible error that a developer may encounter when using this library for the first time. If you want to have the location of the certificate being computed by reversing the package name, as explained in Reverse package name to obtain remote certificate URL, you still need to populate an associative map with entries like (“any.package.name”, null) and use it as a parameter of the method
createDexClassLoader(). To understand why the class works in this way think of this system as a kind of white listing. Only those classes inside package names which are declared into the associative map or directly descend from one of the declared package names will be considered as possible valid ones, while all classes belonging to a not listed package name or not a descendant of the declared ones will be immediately rejected.And this is exactly what happens in this test case where no associative map is provided and so all the classes in the two containers, including the target
NasaDailyImage, are prevented from being loaded since there is no clue on the certificate location.Test case 2: Unsuccessful load of a class through
SecureDexClassLoaderwith an associative map (Debug certificate)In the second test case you can see different ways to populate the associative map
packageNamesToCertMap, used to link packages with certificates location.Warning
Always keep in mind that prior to downloading a certificate from the web the certificate for that package will be searched inside the application-private directory reserved for certificates and then possibly at the remote location. If you wish to just look at the remote URL without considering cached certificates, always remember to wipe out private application data through the invocation of the method
wipeOutPrivateAppCachedData()before dismissing yourSecureDexClassLoaderinstances. In such a way every time that a newSecureDexClassLoaderis created, you will be sure that no cached resource will be associated with it.The first
put()call inserts the package name headfirstlab.nasadailyimage of the class that we would like to load later in the example and associates it with a valid remote URL. What you can immediately notice by pointing your browser to that URL is that the remote certificate in this case is a self-signed developer one since the subject of the certificate is also the issuer of it but, as it is mentioned in the Quick start and tutorial, this is perfectly fine in the Android environment.The second entry inserted into the associative map provides a remote URL to an inexistent certificate (once again you can try to point there your browser to easy spot this out). More over since no certificate for the package name ``it.polimi.example`` has been already cached into the application-private certificate directory, then no certificate is available for it and that is the reason why any class belonging to the
it.polimi.examplepackage will be rejected and prevented from being loaded bySecureDexClassLoader.Lastly the third
put()call on the associative map will insert a package name that will be also used to construct the remote certificate URL (reverse package name). Once again the final remote URL (https://polimi.it/example3/certificate.pem) points to no certificate so any class, whose package name is it.polimi.example3, will be rejected from being loaded.In the end a
SecureDexClassLoaderis generated using as a container file a valid apk containing the target class but signed with a certificate, the Debug Android Certificate, which is different from the one issued by the developer. For such a reason the result of theloadClass()method will be that no class object is going to be returned since the apk is not signed with the required certificate.Test case 3: Unsuccessful load of a class through
SecureDexClassLoaderwith an associative map (Failed signatures verification of some container’s entries)In the third test case you can immediately notice that all the settings for the invocation of
SecureDexClassLoaderare equals to those of the previous case except for the chosen apk container. In fact, while before the container was signed with a non valid certificate, this time the container is signed with the right certificate but someone modified a couple of the entries signature, which do not match anymore with the one obtained during the signing procedure. To sum up also in this case no class will be loaded since this container results to be partially corrupted and so not safe.Test case 4: Successful load of a class through
SecureDexClassLoaderwith an associative mapIn this last test case a successful example of dynamic code loading is shown. This time
SecureDexClassLoaderis initialized with a valid apk container, signed with the correct developer certificate, and with the associative map previously initialized in Test case 2. The whole process works fine since this associative map contains the necessary key entry headfirstlab.nasadailyimage and the related developer certificate has been already cached during Test case 2. Finally during the signature verification step inside theloadClass()method all the entries inside the container match properly with their signature and the certificate used for that signing process is exactly the one linked to headfirstlab.nasadailyimage package. That is the reason why dynamic loading ofNasaDailyImageactivity is allowed.
DexClassLoader (jar) vs SecureDexClassLoader (jar)
A different scenario to show the power of dynamic code loading and the security weakness of the standard DexClassLoader is represented by the following example. In this case another activity (the source code is contained into DexClassSampleActivity.java) instantiates a certain number of GUI components (a couple of buttons, a text view, a switch..) and then customizes them according to the methods of an object belonging to the external class ComponentModifier, which is dynamically loaded at run time.
Depending on the user choice (tapping the first button in stead of the second one) a different extension class of ComponentModifier is loaded and a different behavior is shown to the user even if the static code shown in DexClassSampleActivity is exactly the same (as you can easily check by inspecting the method onBtnClick()). This loading operation can be realized easily by means of DexClassLoader as shown in the method retrieveComponentModifier() of the source code..
That’s just a pity that the container used to load dynamically the class by DexClassLoader in this example is actually randomly selected at run time between either a benign version or a repackaged one of the original apk and so malicious code could potentially have been executed without the user even notice it!
But let’s explain how this could possibly happen: in DexClassSampleActivity there is a simple private method called randomContainerPathChoice(), which in this case is invoked before the instantiation of both DexClassLoader and SecureDexClassLoader and which select randomly the path of either the benign version of the ComponentModifier container, stored in the string jarContainerPath, or the path of the repackaged one with the string jarContainerRepackPath.
DexClassLoader won’t notice and care about this difference as long as in both the containers there is an implementation of the required target class to load and that is the reason why repeating tapping on the first button ‘’Click me!’’ in the Activity screen multiple times will end up in executing two different version of the same FirstComponentModifierImpl class.
On the other hand if you perform the same experiment with SecureDexClassLoader the repackaged apk container choice this time will be detected and blocked during the signature verification procedure against the developer certificate in the loadClass() method. This is possible since malicious modified entries will not succeed in the signature verification check computed by considering both the initial signature stored inside the container and the developer certificate retrieved from the associative map used to initialize the SecureDexClassLoader instance. Thanks to this, SecureDexClassLoader won’t load the customization classes inside the repackaged container and it will just end up the activity, which is exactly the secure behavior that you, as a developer, would like to obtain :)